This is a series Henri invited me to submit. My hope is it will provide a conversation start for both some of us who are using Skylum’s photo editing software or will decide to start using it. Neo is the latest version but Luminar 4 is the most broadly used to date.
This first image is SooC which stands for Straight out of Camera. No editing has been done.
As you can tell this was shot with flash located about 1 m higher and 3 m to the left of the camera position. This was not a prepared shoot. This gentleman was kind enough to strike this stance with his dog and I gave no directions at all.
The second image has been edited in Apple’s Preview App.
The format is in JPEG. This means the data recorded on the SD card has had an algorithm applied to it to reduce the image size and in so doing the raw data has been compromised by averaging and blending.The second image below has been edited in Apple’s Preview App.The format is in JPEG. This means the data recorded on the SD card has had an algorithm applied to it to reduce the image size and in so doing the raw data has been compromised by averaging and blending.
Editing was done in the following order.
1. Cropped so that the lighted grasses on the right, the white snow on the left, the mostly black sky and foreground sidewalk have been removed.
2. The set of tools contain an “adjust colour” which provides a histogram with 3 position arrows to adjust from shadows (black) on the left, mid tones in the middle and light (white) on the right. When moving the end arrows inward some of the RGB ( red green blue code ) is removed from the display. The mid tones arrow can be slid which places more emphasis toward either extreme. I used this to delete some of the black and near black code which removed the lowly lit house and window to the left of the model’s head. I could have come further to remove the bushes on the right and grass under the models right arm but in so doing the model’s hand coming at the camera would have been lost with its black glove.
3. Lastly, I moved the temperature all the way to the warm edge which changed the yellow collar to a richer gold colour.
The last 2 images were edited in Luminar 4 using the raw image supplied by the camera.
Using the “free” setting in cropping reduce all 4 sides of the image in a similar manner as was done in Preview. This tool also allows the image to be rotated. In tilting it to the right I felt it gave the pose a little more dynamic stance, got the dog leash to become parallel to the right margin and thus slightly less distracting. More on the leash later.
Using clone and erase tools next I was able to remove all the small bits of non black in the background and I also decided to remove the leash altogether.
Under the group name of Essentials the first option is Light. In this set are temperature, tint, Exposure, Smart Contrast, High Lights and Shadows. All of these were tweaked to my liking.
There are many more controls in Essentials that I didn’t feel needed changing. Advanced settings where powerful curves and black and white are found is followed by 8 more controls.Then there are 3 more main headings, Creative, Portrait and Professional.
The next image was done with the same raw image to start.
It took just 2 clicks preceded by the same cropping as above.
Here I choose a category called “Looks”, which are prefabricated settings put together using AI to give 1 stop shopping so to speak to achieve a particular product.
I chose the group “Dramatic” and the particular setting called “Mystic”. That’s all there was to get this image.
with appreciation for the neighbour who volunteered himself and his dog in the Power Ranger costume
Perhaps in the future, another image can be used where landscapes can be edited.
A final note. The artificial intelligence, AI, would be yet another presentation where “Looks” came from and lots of other options can be found.
I have limited experience using masks and layers so others who wish to contribute please feel free.
Bill, thanks for this detailed contribution to the post processing subject. I will give Luminar 4 another try. It has just been sitting on my computer, un-used.
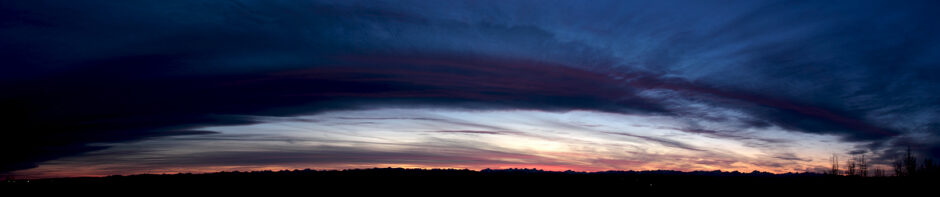
This is a SooC RAW image shot toward the eastern horizon at sunrise. I chose it for its wide light range but it lacks much of the colour wheel so perhaps something with lots of colours in various hues will be my next choice.
This is the final edit. The steps taken are below in the order they were done with brief explanations.
Usually I crop to make a tighter composition. But I didn’t know what the changes would do so I started with erasing. The 3 high ride buildings, red sided sign were eliminated.
Cropped the left side using the free setting so I wasn’t constrained by a certain ratio.
The Presets called Looks were used next with Essentials first set called AI image enhancer. This takes the entire image into consideration using the Luminar algorithms refined over each software update. Luminar 4 is the 5th major update.
I wanted more of the same effects so used AI structure @50% and then boosted it 50%.
Next was details enhancer where small of the small medium and large choices was made to bring out the furry details of Taz’s coat.
Vignette works by choosing the centre ( Taz ) and then the amount and size can be determined.
At this stage of the changes a water mark from the lens is seen in the upper right so the eraser was used once more.
The Looks helped me to get started because they make the changes quickly so you can see what you like and don’t like.
Here is my attempt at image enhancement with Luminar 4 AI. First here is an image that I took in my somewhat cluttered basement of my African Princess sculpture. Taken with a single LED floodlight and enhanced in Photoshop with the cloning tool, just to hide the basement clutter.
Here is the Luminar 4 AI Image Enhancement option. That is after I played around with the “layers” option Clone and Stamp to distribute the bokeh effect. Then just selected the AI Image Enhancer from the bottom film-strip. I am quite impressed with the effect.
This is a series Henri invited me to submit. My hope is it will provide a conversation start for both some of us who are using Skylum’s photo editing software or will decide to start using it. Neo is the latest version but Luminar 4 is the most broadly used to date.
This first image is SooC which stands for Straight out of Camera. No editing has been done.
As you can tell this was shot with flash located about 1 m higher and 3 m to the left of the camera position. This was not a prepared shoot. This gentleman was kind enough to strike this stance with his dog and I gave no directions at all.
The second image has been edited in Apple’s Preview App.
The format is in JPEG. This means the data recorded on the SD card has had an algorithm applied to it to reduce the image size and in so doing the raw data has been compromised by averaging and blending.The second image below has been edited in Apple’s Preview App.The format is in JPEG. This means the data recorded on the SD card has had an algorithm applied to it to reduce the image size and in so doing the raw data has been compromised by averaging and blending.
Editing was done in the following order.
1. Cropped so that the lighted grasses on the right, the white snow on the left, the mostly black sky and foreground sidewalk have been removed.
2. The set of tools contain an “adjust colour” which provides a histogram with 3 position arrows to adjust from shadows (black) on the left, mid tones in the middle and light (white) on the right. When moving the end arrows inward some of the RGB ( red green blue code ) is removed from the display. The mid tones arrow can be slid which places more emphasis toward either extreme. I used this to delete some of the black and near black code which removed the lowly lit house and window to the left of the model’s head. I could have come further to remove the bushes on the right and grass under the models right arm but in so doing the model’s hand coming at the camera would have been lost with its black glove.
3. Lastly, I moved the temperature all the way to the warm edge which changed the yellow collar to a richer gold colour.
The last 2 images were edited in Luminar 4 using the raw image supplied by the camera.
Using the “free” setting in cropping reduce all 4 sides of the image in a similar manner as was done in Preview. This tool also allows the image to be rotated. In tilting it to the right I felt it gave the pose a little more dynamic stance, got the dog leash to become parallel to the right margin and thus slightly less distracting. More on the leash later.
Using clone and erase tools next I was able to remove all the small bits of non black in the background and I also decided to remove the leash altogether.
Under the group name of Essentials the first option is Light. In this set are temperature, tint, Exposure, Smart Contrast, High Lights and Shadows. All of these were tweaked to my liking.
There are many more controls in Essentials that I didn’t feel needed changing. Advanced settings where powerful curves and black and white are found is followed by 8 more controls.Then there are 3 more main headings, Creative, Portrait and Professional.
The next image was done with the same raw image to start.
It took just 2 clicks preceded by the same cropping as above.
Here I choose a category called “Looks”, which are prefabricated settings put together using AI to give 1 stop shopping so to speak to achieve a particular product.
I chose the group “Dramatic” and the particular setting called “Mystic”. That’s all there was to get this image.
with appreciation for the neighbour who volunteered himself and his dog in the Power Ranger costume
Perhaps in the future, another image can be used where landscapes can be edited.
A final note. The artificial intelligence, AI, would be yet another presentation where “Looks” came from and lots of other options can be found.
I have limited experience using masks and layers so others who wish to contribute please feel free.
Bill, thanks for this detailed contribution to the post processing subject. I will give Luminar 4 another try. It has just been sitting on my computer, un-used.
This is a SooC RAW image shot toward the eastern horizon at sunrise. I chose it for its wide light range but it lacks much of the colour wheel so perhaps something with lots of colours in various hues will be my next choice.
This is the final edit. The steps taken are below in the order they were done with brief explanations.
Usually I crop to make a tighter composition. But I didn’t know what the changes would do so I started with erasing. The 3 high ride buildings, red sided sign were eliminated.
Cropped the left side using the free setting so I wasn’t constrained by a certain ratio.
The Presets called Looks were used next with Essentials first set called AI image enhancer. This takes the entire image into consideration using the Luminar algorithms refined over each software update. Luminar 4 is the 5th major update.
I wanted more of the same effects so used AI structure @50% and then boosted it 50%.
Next was details enhancer where small of the small medium and large choices was made to bring out the furry details of Taz’s coat.
Vignette works by choosing the centre ( Taz ) and then the amount and size can be determined.
At this stage of the changes a water mark from the lens is seen in the upper right so the eraser was used once more.
The Looks helped me to get started because they make the changes quickly so you can see what you like and don’t like.
Thanks for showing this Bill. I will try something similar with the AI image enhancer. (see below)
Here is my attempt at image enhancement with Luminar 4 AI. First here is an image that I took in my somewhat cluttered basement of my African Princess sculpture. Taken with a single LED floodlight and enhanced in Photoshop with the cloning tool, just to hide the basement clutter.
Here is the Luminar 4 AI Image Enhancement option. That is after I played around with the “layers” option Clone and Stamp to distribute the bokeh effect. Then just selected the AI Image Enhancer from the bottom film-strip. I am quite impressed with the effect.