This is the page to post images that you would like to discuss that don’t adhere to the challenge theme. Upload images no larger than 1600 pixels wide or 1050 pixels high.
This is the page to post images that you would like to discuss that don’t adhere to the challenge theme. Upload images no larger than 1600 pixels wide or 1050 pixels high.
It was my grandson’s turn to be goalie this week. Despite the fact he could he hardly move in the goalie pads he did quite well.
1/1250s, f2.8, ISO 1250. This picture is about 80 percent of the original RAWW file. I used AWB but checked it by using the eyedropper in LR. I denoised the image, adjusted the shadows, hilites etc and then sharpened using Topaz Photo AI.
I had checked into settings for hockey and most suggest shooting wide open with your lens with a shutter speed over 1000s. This requires a high ISO inside an arena. Lightroom did a good job in removing the noise from the high ISO.
Great explanation Paul.
having fun with AI with the polar bear photo
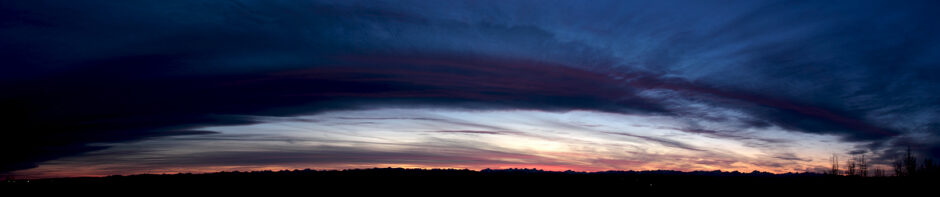
ISO 500 112mm f4.8 1/4000
Did you generate a new background? What was the original like?
yes with generative fill
original image
another attempt , replace the background with one of my own sky
Della, I really like this one where you replaced the background with sky.
Thank you, Fred. I like the simple background better too.
Amazing what AI can do. I like this one better as well.
I was driving home from Bridgeland and saw how perfect downtown looked. I headed over to Scotsman Hill for this quick shot. 1/25 s, f2.8, ISO 2500. Shot at 105mm with a 24-105mm f2.8L IS lens on a Canon R5
I saw a technique in a photo magazine that played with the bokeh of the image. I brought this into Photoshop, duplicated the layer then applied a Filter – Other-Maximum. I used blend modes to get this image. Edited in LR after the blend and the sharpened in Photo AI.
Very nice image! Paul, What is the effect of the special filter ?
I keep trying to understand all the filters in Photoshop. I saw this technique is a photo magazine. Shoot the scene wide open and then use the maximum filter on a duplicate layer. The maximum filter replaces the current pixel’s brightness value with the highest or lowest brightness value of the surrounding pixels. The maximum filter has the effect of applying a choke—spreading out white areas and choking in black areas. If you are using the filter and slide it far to the right it creates almost a bokeh effect.
Thank you very much.
Nice and interesting shot. Looks to be very interesting technique. Hmmm! Perhaps I should suck it up and invest some time getting more familiar with Photoshop and particularly, filters.
Sunrise this morning. Taken with my smartphone in pro mode. Dialed down the exposure to get this red sunrise.
Wow, beautiful colours, and so much textural variety in the clouds.
Ceramics on one of the buildings at the Guga S’Thebe Arts & Cultural Centre in Langa Township, Cape Town, South Africa. With a mandate of making arts and culture accessible to all, the centre features a theatre space, pottery workshop, mosaics studio, drumming and more (I had a bongo drumming lesson – fun and embarrassing!).
ISO 800, 40 mm, f/7.1, 1/2500
Really colourful. I like the abstract quality of this picture. The large fields of yellow and blue. The read jacket really stands out and draws the eye.
Thanks Henri! Yes, I see it as colour blocking with added interest.
Woke up at 5:30 this morning. Remembered we talked about shooting downtown sunrise/sunset from pedestrian bridge over the LRT on Bow Trail (26 ST SW). So off I went to do that. No clouds over to the east so just typical sunrise. But did get this shot. Shot at f/22, 25 sec., 70 mm and ISO 160. However it s greatly enhanced in LR having adjusted exposure, contrast, clarity, shadows and, saturation for six individual colours. The blue and green lines is the LRT train going toward downtown. I was hoping to get trains going in opposite directions synchronized to meet at shooting point as well as vehicles in both directions…need too much luck to get that type of synchronization. If you go shoot there, to get uninterrupted lines you will need a minimum shutter speed of 20 seconds for trains going toward downtown and 25 seconds going in the opposite direction.
Great sunrise image. Love the light streaks. Great advice on the time intervals needed.
My favourite lens? It is the one that cost me the least, Nikon 50 mm 1.8. I do not use it nearly often enough because it is a fixed lens and I have gotten too lazy (and old and crotchety) to lug around a bag full of stuff. It shoots beautiful pictures as this photo attests. It is an archive photo. A friend asked me to shoot her daughter’s wedding. BTW this is one photo I went the opposite of sharpening, increased luminance, to soften and smooth out skin complexion. Also, shot at 1/50 sec holding as steady as I could to avoid using flash.
Great candid wedding photo. I think with some of the new masking tools it would be quite easy to enhance the white in the bride’s eyes and contrast in her hair.
Lake Minnewanka
taken with a cell phone
Winter wonderland in Lake Louise
f/3.1, 1/125, iso100
Wow, the colour really pops against the monochrome scene.
My wife made this lovely Tuxedo coat to ring in the new year. Taken with my smartphone and enhanced in Photoshop AI, altering the distracting background.
Cute overload!
Lake Windermere shoreline ice patterns. Taken with iPhone, ISO 40, f/2.2, 1/120. Basic adjustments in Apple Photos, sharpening in GIMP.
Beautiful abstract Ron. There is photography to be had in all kinds of small spaces.
.
Golden Hour on Nose Hill. Taken with iPhone, ISO 25, f/2.2, 1/271. Basic adjustments in Apple Photos, sharpening in GIMP.
Decided I overdid the light adjustments a bit on this image. Here is a more realistic version.
I agree with your second interpretation.
My husband and I were predicting when the amaryllis would open and we both lost – it bloomed January 2nd. The sun is at a perfect angle about 330 pm. This is with my cell phone, using the “pro” feature which gave me the setting of F 1.8 1/500 sec and ISO 40. It also gave me an option of doing a grey blurred background, which gave it a “high” key image.
Winter sunrise against the snow. I like the new moon showing in the sky.
Taken with my Pixel phone.
f/1.7, 1/35 sec, ISO 20.
Edited using Photoshop Elements:
Cropped to 16×9, haze removal to darken the sky, increase saturation of red, yellow and magenta.
these are two pictures taken on our trip east this one is Peggys Cove I dehazed and sharpened and replaced the sky as it was a dull day.
this old train station in Cleveland is in a more seedy part of town. I removed power lines barricades and part of my truck mirror, sharpened.
On Dec 26th with the prospect of capturing the Cold Moon I set up my tripod and FujiXT-5 and a 150-600mm lens at RiverPark in hope of capturing the Moon over downtown. I feared it would rise south of downtown and that is what happened, so only one building for reference in the photo.
First image, an in camera Fuji Monochrome jpeg with the R-filter to increase contrast.
ISO 64/F 8.0/SS@1/50. Further processed in Luminar NEO
Second image about 5 onuses later in full golden hour. RAW file processed in Luminar, same setting as first image.